Overview
The Trimble Connect Workspace API allows the client applications to interact with Trimble Connect for Browser.
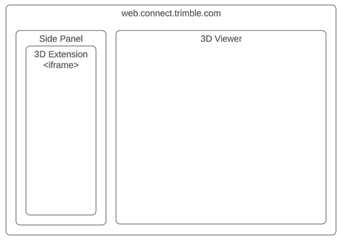
The main use cases are 1. Extensions
1.1 Trimble Connect 3D Extensions
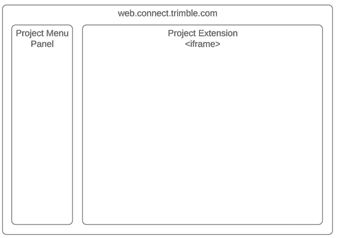
1.2 Trimble Connect Project Extensions
2.1 Embedded Trimble Connect 3D Viewer
2.2 Embedded Trimble Connect File Explorer
2.3 Embedded Trimble Connect Project List
Getting Started
Installation
For Typescript use, add the Trimble Connect Workspace API component as a dependency to your project. The component bundles TypeScript v2 definition files for use in TypeScript projects and to support tools that can read .d.ts files. For ES6-module-friendly consumers, you can also import the modules directly, or import them from the root module.
Install the trimble-connect-workspace-api npm package.
npm i trimble-connect-workspace-api --save
Alternatively, it is also possible to directly import the IIFE module from the below URL.
<script src="https://components.connect.trimble.com/trimble-connect-workspace-api/index.js" />
Connect to the API
Workspace API communication is initiated using the connect method
that will return a WorkspaceAPI instance that hosts the API methods.
Workspace API events can be intercepted in the optional onEvent handler passed into the connect method.
The workflow of the Workspace API can be illustrated as below:

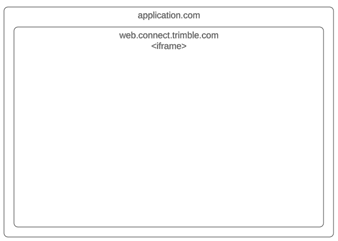
Technically Workspace API utilizes window.postMessage() for the API communication. Embedding extensions in Trimble Connect or Trimble Connect in client applications is done using iframes.
Call the API methods
Once you have the Workspace API instance, calling the API methods is easy. An example using getProject from ProjectAPI:
const project = await API.project.getProject();
1. Extensions
Web-based client applications can be embedded inside Trimble Connect for Browser as extensions.
Extensions can be installed to a project by project administrators either in project or 3D Viewer settings. They can also be enabled/disabled there.
Custom extensions are installed by providing a manifest url. The manifest structure is explained later.
Connecting to the API
As extensions are running inside Trimble Connect, the connect method should be invoked as follows
const API = await WorkspaceAPI.connect(window.parent, ...);
Authentication
In the case of extensions, the Connect application will manage the user session and accessToken.
When the client application is embedded inside Connect as an extension, the accessToken should be retrieved by calling the extension.requestPermission API.
This call will initially return pending while displaying a message requesting for user consent for the extension to use the accessToken.
If the user gives consent, Connect will emit an extension.accessToken event with the accessToken. This will also happen every time the token is refreshed.
Once consent is given, subsequent API calls will also directly return the accessToken.
If the user has denied the consent, the API call will keep returning denied.
The user can reset the consent status anytime from extension settings.
Manifests and CORS
While adding new custom extensions, please ensure your manifest file url is CORS enabled to avoid any issues in the extension creation. As the Connect application will try to download the extension manifest file to read it's contents before creating the extension, it is important that the manifest file url (example: https://foo.example.manifestfile.com/manifest.json) is CORS enabled to allow access from Trimble Connect for Browser. For example, when the application tries to fetch the file, the server should respond with proper CORS response headers (Example: Access-Control-Allow-Origin, Access-Control-Allow-Methods etc.,). Please refer to Cross-Origin Resource Sharing (CORS) for details.
1.1 Trimble Connect 3D Extensions
Trimble Connect for Browser allows integrators to expose additional functionalities in Trimble Connect 3D Viewer in the context of a project.

Check out the Sample application as an extension.
Example
<script src="https://components.connect.trimble.com/trimble-connect-workspace-api/index.js"></script>
<script>
  var API = await TrimbleConnectWorkspace.connect(window.parent, (event, data) => {
    console.log("Event: ", event, data);
  });

  API.project.getProject().then(project => {
    console.log(project); // Trimble Connect project details
  });
</script>
3D Extension Manifest
The extension manifest is a JSON document that describes the extension parameters.
The data structure follows the ExtensionSetting interface, for example:
{
  "url": "https://my.awesome.app/extension",
  "title": "Awesome extension",
  "icon": "https://my.awesome.app/extension/favicon.ico",
  "infoUrl": "https://my.awesome.app/extension/help.html"
}
1.2 Trimble Connect Project Extensions
Trimble Connect for Browser allows integrators to expose additional functionalities in Trimble Connect for Browser's file explorer in the context of a project.
This allows creation of new extensions through manifest files and displays the menu provided by the extension in Connect's left navigation panel. It also allows additional configuration for the extensions if needed (through configCommand property).
The extension is embedded inside Trimble Connect for Browser application and it will occupy the middle & right panel within the Project page and the extension menu will appear in the left panel along with other navigation.

Check out the Sample manifest - you can try it out by installing it.
Example
import * as WorkspaceAPI from "trimble-connect-workspace-api";

....
....

this.API = await WorkspaceAPI.connect(
  window.parent,
  (event, args) => {
    switch (event) {
      case "extension.command":
      //"Command executed by the user: args.data"
        break;
      case "extension.accessToken":
      //"Accestoken or status: args.data"
        break;
      case "extension.userSettingsChanged":
      //"User settings changed!"
        break;
      default:
    }
  },
  30000 // connection timeout in milliseconds.
);

....
....

const mainMenuObject = {
  title: "Test extension app",
  icon: "http://example.com/main_menu_icon.png",
  command: "main_nav_menu_cliked",
  subMenus: [
    {
      title: "Sub menu 1",
      icon: "http://example.com/sub_menu_icon.png",
      command: "submenu_1_clicked",
    },
    {
      title: "Sub menu 2",
      icon: "http://example.com/sub_menu_icon.png",
      command: "submenu_2_clicked",
    },
  ],
};

// Updating the menu object.
this.API.ui.setMenu(mainMenuObject);

// Updating the active submenu.
this.API.ui.setActiveMenuItem("submenu_1_clicked");

// Get the current project info
this.API.project.getCurrentProject().then((projectInfo: ConnectProject) => {
    //Current project info: projectInfo.
});
//Get the current user language info.
this.API.user.getUserSettings().then((userSettings: UserSettings) => {
    //Current user language: userSettings.language
});
//Updating the status message.
this.API.extension.setStatusMessage("<statusMessage>:string");
//Request for the access token.
this.API.extension.requestPermission("accesstoken").then((accessToken: string) => {
    //Current user access token or status: accessToken
});
Example manifest
{
  "icon": "http://example.com/app_icon.png",
  "title": "React example",
  "url": "http://example.com/index.html",
  "description": "Test extension",
  "configCommand": "do_config",
  "enabled": false
}
Project Extension Manifest
Extension is created based on the manifest file shared by the extension author. This can be done through in Connect through Project Settings -> Extensions page by providing the url of the manifest file.
The manifest is a JSON document with the following fields
- title - Title of the extension to be displayed within Project Settings -> Extensions page. This field is mandatory.
- icon - Icon URL of the extension to be displayed within Project Settings -> Extensions page. As per current UX, this field is not used but might be used at a later point in time. This field is optional.
- url - URL for extension (that is the integrator application) application. This is expected to contain the web application that knows how to interact with Connect through Workspace API - provides the menu to be displayed for the extension, provides configuration UI (optional) and other interactions. This field is mandatory.
- description - Description of the extension to be displayed within Project Settings -> Extensions page. This field is optional.
- configCommand - This will be passed to the extension through the command event when the gear icon(configuration icon) is clicked in the Project Settings -> Extensions page. This field is optional.
- enabled (boolean) - This will set the extension as visible on creation. This field is optional. Default is false.
2. Embedded Components
The client application embeds the Trimble Connect components in an iframe.

Connecting to the API
As the Connect component is embedded inside the client application, the connect method should be invoked as follows
const component = document.getElementById("<embedded-component-id>");

const API = await WorkspaceAPI.connect(component, ...);
Authentication
When the client application embeds a Connect component in an iframe, the valid accessToken must be passed to the component using embed.setTokens.
It is the client application's responsibility to proactively refresh the accessToken when needed. The component will help in the process by emitting the extension.sessionInvalid event when the accessToken expired or was invalidated. After the accessToken is refreshed by the client application, it should be passed back to the component by calling the same embed.setTokens API with the new accessToken.
Embedded component authentication is done as follows
await API.embed.setTokens({accessToken: "<accessToken>"});
2.1 Embedded Trimble Connect 3D Viewer
Embed the 3D Viewer from https://web.connect.trimble.com/?isEmbedded=true inside an application using an iframe.
The embed.init3DViewer function is responsible for initializing the Trimble Connect 3D Viewer in the embedded context.
Check out the Sample application.
Example
Embed the 3D Viewer inside the application using an iframe: This should be done after the iframe has been loaded. The connection initiation should be done in an async function as the connection is only established once the user has selected a Trimble Connect project in the 3D Viewer.
<script src="https://components.connect.trimble.com/trimble-connect-workspace-api/index.js"></script>
<div>
  <button onclick="doConnect()">connect</button>
  <iframe hidden id="viewer" src="https://web.connect.trimble.com/?isEmbedded=true" width="100%" height="750px"/>
  <script>
      function doConnect(){
        var viewer = document.getElementById("viewer");
        viewer.hidden = false;
        var API = await TrimbleConnectWorkspace.connect(viewer, (event, data) => {
          console.log("Event: ", event, data);
        });
        API.embed.setTokens({accessToken: "accessToken_here"});
        API.embed.init3DViewer({projectId: "projectId_here"});
      }
  </script>
</div>
Query parameters
We recommend using embed.init3DViewer for setting these parameters. With this method you can pass all the possible query params as a config argument to init3DViewer, so use of explicit query params is not needed.
The query parameters can be used to initialize the viewer without any API interaction. In this case, the 3D Viewer should be embedded using the URL
https://web.connect.trimble.com/projects/:projectId/viewer/3d
where projectId can be undefined if you want to select a project from the projects list.
The supported query parameters are:
embed:https://web.connect.trimble.com/projects/:projectId/viewer/3d/?embed=falseSpecifies if the application is embedded in a sandboxed environment. Iftrue, the application will emulate the local storage.projectId:https://web.connect.trimble.com/projects/:projectId/viewer/3d/?projectId=projectIdThe id of a project that will be automatically loaded by 3D Viewer, if it exists.modelId:https://web.connect.trimble.com/projects/:projectId/viewer/3d/?projectId=projectId&modelId=my_model_id1,my_model_id2The id of a model that will be automatically loaded by 3D Viewer, if it exists in the specified project. Used in conjuction withprojectId. Accepts an array of values, separated by comma.versionId:https://web.connect.trimble.com/projects/:projectId/viewer/3d/?projectId=project_id&modelId=model_id1,model_id2&versionId=model_version_id1,model_version_id2The version id of a model that will be automatically loaded by 3D Viewer, if it exists in the specified project. Used in conjuction withmodelIdandprojectId. Accepts an array of values, separated by comma.viewId:https://web.connect.trimble.com/projects/:projectId/viewer/3d/?projectId=projectId&viewId=my_view_idThe id of a view that will be automatically loaded by 3D Viewer, if it exists. Used in conjuction withprojectId.todoId:https://web.connect.trimble.com/projects/:projectId/viewer/3d/?projectId=projectId&todoId=my_todo_idThe id of a to do that will be automatically loaded by 3D Viewer, if it exists. Used in conjuction withprojectId.clashSetId:https://web.connect.trimble.com/projects/:projectId/viewer/3d/?projectId=projectId&clashSetId=my_clash_set_idThe id of a clash set that will be automatically loaded by 3D Viewer, if it exists. Used in conjuction withprojectId.stoken:https://web.connect.trimble.com/projects/:projectId/viewer/3d/?stoken=my_shared_tokenThe 3D Viewer will be authorized using the Trimble Connect share token and will display the shared model(s).
2.2 Embedded Trimble Connect File Explorer
Initiate Trimble Connect Embedded File Explorer.
The embed.initFileExplorer function is responsible for initializing the trimble connect explorer page in the embedded context.
Check out the Sample application.
Example - HTML
<div>
  <button onclick="doConnect()">connect</button>
  <iframe hidden id="explorerIframe" src="#" width="100%" height="750px"></iframe>
  <div>
    <script src="https://components.connect.trimble.com/trimble-connect-workspace-api/index.js"></script>
    <script>
        var folderId = `<folderId>`,   /*(optional)*/
        projectId = `<projectId>`;
        var tokenConfig = {
          accessToken: `<accessToken>`
        }
        var explorerConfig = {
          projectId,
          folderId
        };
        function doConnect(){
          var iframeElement = document.getElementById("explorerIframe");
          iframeElement.src = TrimbleConnectWorkspace.getConnectEmbedUrl();
          iframeElement.hidden = false;
          TrimbleConnectWorkspace.connect(
            iframeElement,
            (event, args) => {
              console.log("Event log: ", event, args);
            },
            30000,
          ).then(async (API) => {
            await API.embed.setTokens({ ...tokenConfig });
            await API.embed.initFileExplorer({ ...explorerConfig });
          });
        }
    </script>
  </div>
</div>
Example - ReactJS
import React, { useRef, useEffect } from "react";
import * as WorkspaceAPI from "trimble-connect-workspace-api";
export const Projects = () => {
  const iframeRef = useRef<HTMLIFrameElement>(null);
  const folderId = `<folderId>`,  projectId = `<projectId>`, env = "stage";   //folderId is optional
  const tokenConfig = {
    accessToken: `<accessToken>`
  }
  const explorerConfig = {
    projectId,
    folderId
  };
  useEffect(() => {
    iframeRef.current.src = WorkspaceAPI.getConnectEmbedUrl();
    iframeRef.current.hidden = false;
    WorkspaceAPI.connect(
      iframeRef.current,
      (event, args) => {
        console.log("Event log: ", event, args);
      },
      30000
    ).then(async (API) => {
      await API.embed.setTokens({ ...tokenConfig });
      await API.embed.initFileExplorer({ ...explorerConfig });
    });
  }, []);
  return (
    <div>
      <iframe
          hidden
          src="#"
          ref={iframeRef}
          width="100%"
          height="750px"
          title="embedExplorer"
          />
    </div>
  );
};
2.3 Embedded Trimble Connect Project List
Initiate Trimble Connect Embedded Project List.
The embed.initProjectList function is responsible for initializing the trimble connect projects list page in the embedded context.
Check out the Sample application.
Example - HTML
<div>
  <button onclick="doConnect()">connect</button>
  <iframe hidden id="projectsIframe" src="#" width="100%" height="750px"></iframe>
  <div>
    <script src="https://components.connect.trimble.com/trimble-connect-workspace-api/index.js"></script>
    <script>
      var tokenConfig = {
          accessToken: `<accessToken>`
      };
      var projectEmbedFeatures = {
          enableRegion: "na",
          enableNewProject: true,
          enableCloneProject: true,
          enableLeaveProject: true,
          enableThumbnail: true,
          embedViewMode: "list",
        };
        function doConnect(){
          var myIframe = document.getElementById("projectsIframe");
          myIframe.src = TrimbleConnectWorkspace.getConnectEmbedUrl();
          myIframe.hidden = false;
          WorkspaceAPI.connect(
            myIframe,
            (event, args) => {
              console.log("Event log: ", event, args);
            },
            30000,
          ).then(async (API) => {
            await API.embed.setTokens({ ...tokenConfig });
            await API.embed.initProjectList({ projectEmbedFeatures });
          });
        }
    </script>
  </div>
</div>
Example - ReactJS
import React, { useRef, useEffect } from "react";
import * as WorkspaceAPI from "trimble-connect-workspace-api";
export const Projects = () => {
  const iframeRef = useRef<HTMLIFrameElement>(null);
  const tokenConfig = {
    accessToken: `<accessToken>`
  };
  const projectEmbedFeatures = {
    enableRegion: "na",
    enableNewProject: true,
    enableCloneProject: true,
    enableLeaveProject: true,
    enableThumbnail: true,
    embedViewMode: "list",
  };
  useEffect(() => {
    if (iframeRef.current) {
      iframeRef.current.src = WorkspaceAPI.getConnectEmbedUrl();
      iframeRef.current.hidden = false;
      WorkspaceAPI.connect(
        iframeRef.current,
        (event: any, args: any) => {
          console.log("Event log: ", event, args);
        },
        30000
      ).then(async (API) => {
        await API.embed.setTokens({ ...tokenConfig });
        await API.embed.initProjectList({ projectEmbedFeatures });
      });
    }
  }, []);
  return (
    <div>
      <iframe
        hidden
        src="#"
        ref={iframeRef}
        width="100%"
        height="750px"
        title="embedProjects"
      />
    </div>
  );
};
FAQ
Project Extensions
Who decides on the main navigation menu for the extension? What is the structure of the menu?
The navigation menu object is passed by the extension application (refers to the url mentioned in the extension manifest) to Connect and it renders it in it’s left panel navigation.
The menu object should conform to the below structure. As of now the menu object can contain just two levels - one parent menu item and one/more submenu items. Please note that the values in the sample below are given for illustration purposes only and hence they need to be updated to reflect your extension’s need.
Dynamic Menu Structure: (received from extension while loading the extension. extension creator should be aware of this):
{
"title": "Quadri shared Model",
"icon": "https://abcd.com/images/q.svg",
"command": "QUADRI_TOP_MENU", /*This will be passed to the extension when the menu is licked*/
"subMenus": [
    {
      "title": "Quadri shared Modelsubmenu1",
      "icon": "https://abcd.com/images/q1.svg",
      "command": "QUADRI_SUB_MENU1", /*This will be passed to the extension when the menu is clicked*/
    },
    {
      "title": "Quadri shared Model submenu2",
      "icon": "https://abcd.com/images/q2.svg",
      "command": "QUADRI_SUB_MENU2", /*This will be passed to the extension when the menu is clicked*/
    },
  ]
}
Are the extension manifest url and the extension url the same?
No, they're not.
Extension manifest url contains the configuration for an extension including extension url, title, description, icon etc. This what you will need to enter in the Project Settings -> Extensions page.
Extension url is the actual url where the extension application is deployed. This is set within the manifest file.
Can I pass query params along with submenu command while calling setActiveMenuItem?
Yes, you can.
This may be useful for some extensions if they want use the same submenu for different states/routes (identified through query parameters) which are dynamic in nature.
Example scenario - Let's assume the submenu command is
task. If thesetActiveMenuAPI is called with the commandtask?id=7, this will make the 'task' submenu active and the extension will receive what (command with query parameters - task?id=7) it has passed to the Connect application.
Embedded Components
After an access token has been expired for a few hours, may API.embed.setTokens still be used to wake up the connection?
The embed.setTokens should be called with a new accessToken before the current token expires in order to maintain the seamless user experience.
What is the difference between the error messages received during the integrations with the trimble-connect-workspace-api - “Please refresh the user session. The user session is invalid” and “Access Denied. You don’t have access to the Trimble Connect for Browser modules"
The 1st error will appear when the given accessToken is expired. The 2nd error will appear when the embed.setTokens is called without an accessToken.
Will the same event "embed.session.invalid" be sent for both cases mentioned above?
The accessToken is a required property for the embed.setTokens API param, the Access denied is just a fallback screen for that (in case it's empty). So no event will be passed, But in this case, the boolean promise returned by embed.setTokens will resolve with false. The embed.session.invalid event will be passed only when the accessToken is expired
Support
Please send your questions to connect-support@trimble.com.